How to Deploy Medusa JS on Coolify (Step-by-Step Tutorial)
[Published On September 18, 2025]

In this blog post, I’ll take you through step-by-step on how to deploy your Medusa JS application to Coolify. We’ll cover everything from setting up your VPS to installing Coolify and getting your Medusa app live.
Setting Up Your VPS
To deploy our application on Coolify, we’ll need a VPS (Virtual Private Server). Think of it as a powerful computer sitting in a data center, where you rent a slice of it and use it just like your own machine.
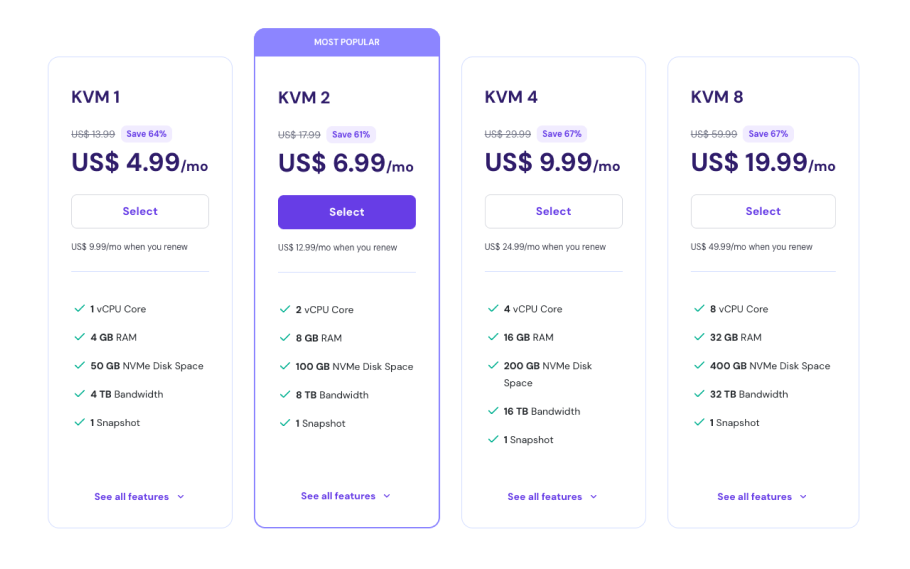
We’ll be renting our VPS through a platform called Hostinger. Head over to hostinger.com and create your account. Once you’re logged in, head to the VPS tab in the dashboard and sign up for a KVM VPS.
On the “Choose an Operating System” screen, select the Ubuntu option. Next, you’ll be prompted to create a root password. Be sure to save it somewhere safe, you’ll need it later.
Hostinger offers several hardware options for their VPS plans. Since Coolify requires at least 2 CPU cores, 2 GB of RAM, and 30 GB of storage, the KVM 2 plan is the best fit for our needs.
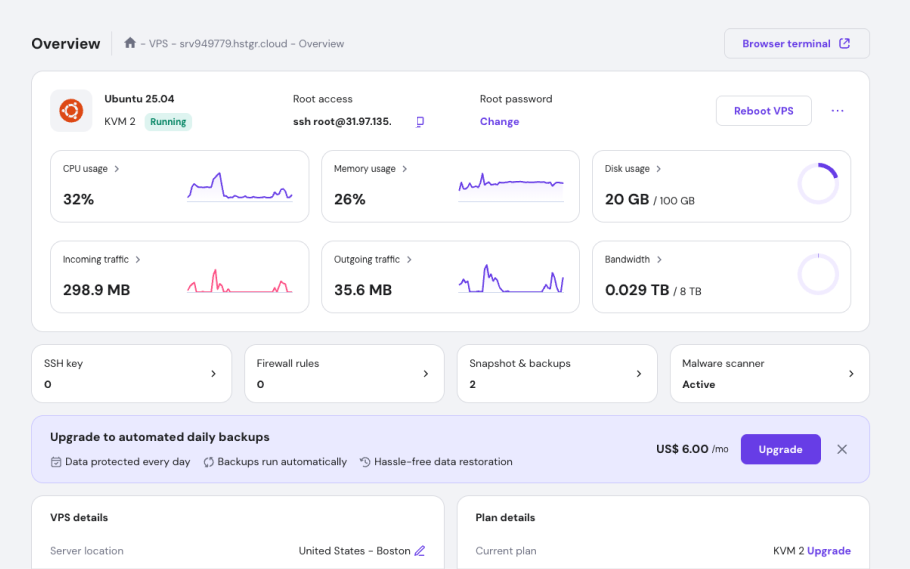
Once the VPS setup is complete, you’ll be taken to a dashboard with all the details about your virtual machine.
Copy the ROOT ACCESS string, it should look something like this ssh root@69.96.420.024 We’ll need this for our next step!
Setting Up Coolify on Your VPS
Open the CLI (Command Line Interface) on your computer. For example, I’m on macOS, so I’ll be using Terminal.
Paste the Root Access string you copied earlier into the terminal and press Enter. You’ll then be prompted to enter your password; this is the same root password you created earlier when setting up the VPS.
Now it’s time to install Coolify on your virtual machine. Run the following command from inside your virtual machine.
1curl -fsSL https://cdn.coollabs.io/coolify/install.sh | bashOnce successful, the script will display your Coolify URL. It should look something like this: http://203.0.113.1:8000. Visit the URL and you'll be redirected to a registration page to create your first admin account.
Once you’ve created an account, you’re ready to spin up your first project.
Setting up PostgreSQL
Create a new project in Coolify and add a PostgreSQL resource to it. Make sure to select the latest version of PostgreSQL; it should be the default option.
Before you deploy and start your PostgreSQL instance, make sure to enable SSL under the SSL configuration and hit save.
Setting up Redis
In the same project you created in the last step, add a new resource for a Redis instance, and deploy.
Medusa Application Configurations
Now, let’s open up our Medusa application and make a few configurations before deploying.
The main thing to understand, and where a lot of people get stuck, is that your Medusa app needs to be deployed twice.
- Server mode: responsible for handling all incoming requests, like API calls from your storefront, admin dashboard, or any integrations.
- Worker mode: runs in the background, managing tasks like scheduled jobs, event subscribers, and other long-running processes.
You’ll need to deploy both for your application to run smoothly.
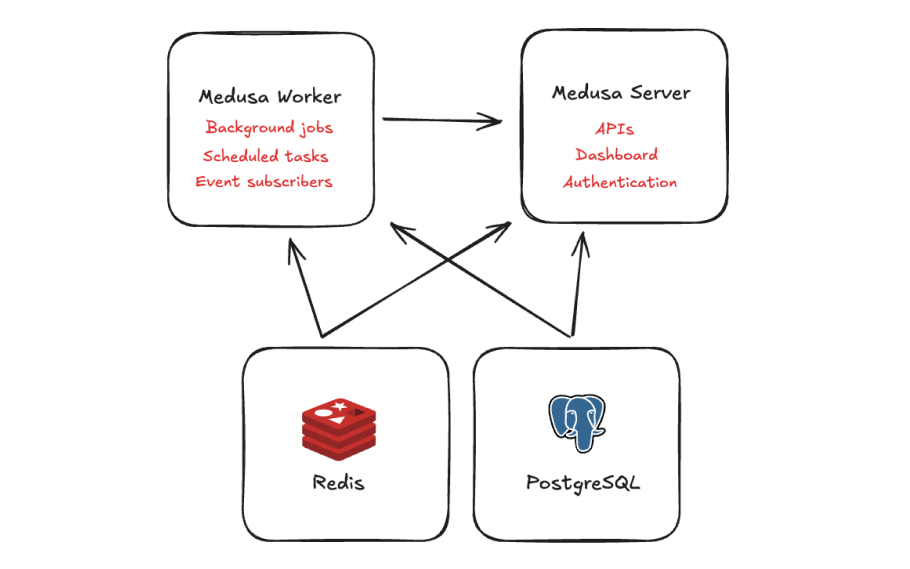
Thankfully, you don’t need separate projects for the server and worker. You can simply specify the worker mode in the medusa-config file.
Update your Medusa config (medusa-config.ts) file to support both server mode and worker mode, and to optionally disable the admin dashboard.
1module.exports = defineConfig({
2  projectConfig: {
3    // other config options...
4    workerMode: process.env.MEDUSA_WORKER_MODE as "shared" | "worker" | "server",
5  },
6  admin: {
7    disable: process.env.DISABLE_MEDUSA_ADMIN === "true",
8    backendUrl: process.env.MEDUSA_BACKEND_URL,
9  },
10})
You’ll set different values for MEDUSA_WORKER_MODE and DISABLE_MEDUSA_ADMIN based on which Medusa instance you’re deploying. MEDUSA_BACKEND_URL defines the backend URL your admin dashboard will connect to.
Redis Configurations
We’ll use the REDIS_URL environment variable to connect Medusa to Redis. In your medusa-config.ts file, add the following line inside projectConfig.
1module.exports = defineConfig({
2  projectConfig: {
3    // other config options...
4   redisUrl : process.env.REDIS_URL
5  },
6})
For production environments, it’s highly recommended to use the Redis-based modules for caching, the event bus, and the workflow engine, rather than relying on the default in-memory versions.
So add the following Redis modules to your Medusa config.
1module.exports = defineConfig({
2  // other configurations....
3  modules: [
4    {
5      resolve: "@medusajs/medusa/cache-redis",
6      options: {
7        redisUrl: process.env.REDIS_URL,
8      },
9    },
10    {
11      resolve: "@medusajs/medusa/event-bus-redis",
12      options: {
13        redisUrl: process.env.REDIS_URL,
14      },
15    },
16    {
17      resolve: "@medusajs/medusa/workflow-engine-redis",
18      options: {
19        redis: {
20          url: process.env.REDIS_URL,
21        },
22      },
23    },
24  ],
25});
26
Create a GitHub Repository
Create a new GitHub repository for your Medusa application, then commit your project files to it.
This will make things much easier when we deploy to Coolify. Plus, it will also allow you to automatically deploy when changes are made to your GitHub project.
New to Github? Follow this guide.
Deploy the Medusa Application in Server Mode
Back in Coolify, we’ll add a new resource for your Medusa application in server mode, apply the necessary configurations, and deploy it.
Create A New Resource
Add a new resource to the project we created earlier, and choose the “Private Repository (with GitHub App)” option. If it’s your first time, you’ll need to go through a few extra steps to connect your GitHub account.
Once connected, select your Medusa application’s GitHub repository. On the configuration settings screen, make sure to select the correct branch, change the port from 3000 to 9000, and click continue.
Start Command & Application Name
After your application is set up, you’ll be taken to the configuration screen. First, rename your application to “server.” This helps avoid confusion later since we’ll be deploying the same application twice.
We’ll also add a custom start command to make sure our Medusa server runs with the proper setup. Copy the command below and paste it into the “Start Command” input.
1cd .medusa/server && npm install && npm run predeploy && npm run startBe sure to click Save each time you make changes. The button is located at the top, next to “General.”
Add Environment Variables
In the Environment Variables tab of your Medusa server application, add the following variables. Be sure to replace <medusa-server-domain-name> with your actual domain name from the previous step.
1
2STORE_CORS=<medusa-server-domain-name>
3ADMIN_CORS=<medusa-server-domain-name>
4AUTH_CORS=<medusa-server-domain-name>
5JWT_SECRET=supersecret
6COOKIE_SECRET=supersecret
7DATABASE_URL=
8MEDUSA_BACKEND_URL=<medusa-server-domain-name>
9DISABLE_MEDUSA_ADMIN=false
10MEDUSA_WORKER_MODE=server
11PORT=9000
12REDIS_URL=
You’ll notice the values for DATABASE_URL and REDIS_URL are still empty. We’ll retrieve these from the PostgreSQL and Redis resources we deployed earlier.
Go to your PostgreSQL resource and copy the “Postgres URL (internal)”. Make sure SSL is enabled, and remove any parameters like ?sslmode=require or ?sslmode=disable from the end of your PostgreSQL database URL.
Paste the Postgres URL into the DATABASE_URL field in your environment variables.
1STORE_CORS=<medusa-server-domain-name>
2ADMIN_CORS=<medusa-server-domain-name>
3AUTH_CORS=<medusa-server-domain-name>
4JWT_SECRET=supersecret
5COOKIE_SECRET=supersecret
6DATABASE_URL=<postgres-url-internal>
7MEDUSA_BACKEND_URL=<medusa-server-domain-name>
8DISABLE_MEDUSA_ADMIN=false
9MEDUSA_WORKER_MODE=server
10PORT=9000
11REDIS_URL=
Go to your Redis resource and copy the “Redis URL (internal).” Paste this into the REDIS_URL field in your environment variables.
1STORE_CORS=<medusa-server-domain-name>
2ADMIN_CORS=<medusa-server-domain-name>
3AUTH_CORS=<medusa-server-domain-name>
4JWT_SECRET=supersecret
5COOKIE_SECRET=supersecret
6DATABASE_URL=<postgres-url-internal>
7MEDUSA_BACKEND_URL=<medusa-server-domain-name>
8DISABLE_MEDUSA_ADMIN=false
9MEDUSA_WORKER_MODE=server
10PORT=9000
11REDIS_URL=<redis-url-internal>
Be sure to click “Save All Environment Variables” at the bottom to save all changes.
Deploy Changes
Now you’re ready to deploy your Medusa server, just click the Deploy button in the top-right corner of the screen.
Deploy the Medusa Application in Worker Mode
Next, we’ll deploy our Medusa application in worker mode. We’ll use the same GitHub repository as before, but update a few environment variables to make it work.
Create A New Resource
Add a new resource, and choose the “Private Repository (with GitHub App)” option.
Select your Medusa application’s GitHub repository. Just like with the server application, go to the configuration settings screen, choose the correct branch, change the port from 3000 to 9000, and then click Continue.
Start Command & Application Name
After your application is set up, you’ll be taken to the configuration screen. First, rename your application to “worker” to differentiate it from the “server” application.
We’ll also add a custom start command. Copy the command below and paste it into the “Start Command” input, and click save.
1cd .medusa/server && npm install && npm run startAdd Environment Variables
To keep things simple, copy the environment variables from your Medusa server application and paste them into the environment variables of your Medusa worker application.
Most of these variables will stay the same, with just a couple of exceptions. Set the MEDUSA_WORKER_MODE to worker and DISABLE_MEDUSA_ADMIN to true. Everything else can remain the same.
1STORE_CORS=<medusa-server-domain-name>
2ADMIN_CORS=<medusa-server-domain-name>
3AUTH_CORS=<medusa-server-domain-name>
4JWT_SECRET=supersecret
5COOKIE_SECRET=supersecret
6DATABASE_URL=<postgres-url-internal>
7MEDUSA_BACKEND_URL=<medusa-server-domain-name>
8DISABLE_MEDUSA_ADMIN=true
9MEDUSA_WORKER_MODE=worker
10PORT=9000
11REDIS_URL=<redis-url-internal>
Deploy Changes
Your Medusa worker is now ready to deploy! When you’re set, click the Deploy button.
Test Deployed Application
Once your deployment is successful, go to <medusa-server-domain-name>/health, If the deployment was successful, you’ll see the OK response. The Medusa admin can be accessed at <medusa-server-domain-name>/app.
If you’re unable to access your Medusa server domain URL, here are some common gotchas to check:
- DNS Propagation / Cache. Clear your DNS cache from your CLI.
- Firewall / Port blocking. Your home router or ISP might be blocking certain ports.
- If you’ve forced HTTPS but your SSL certificate isn’t valid, the URL won’t resolve.
- Make sure you’re using the Medusa server domain, not the worker domain. The server domain is where your admin dashboard lives.
If you’re on a non-HTTPS domain, you won’t be able to log in because cookies can’t be set securely over a non-HTTP connection.
In the next step, we’ll add a custom domain to our Medusa server application.
Add a Custom Domain
Log in to your domain registrar and open the DNS settings for your domain. Remove any old A records.
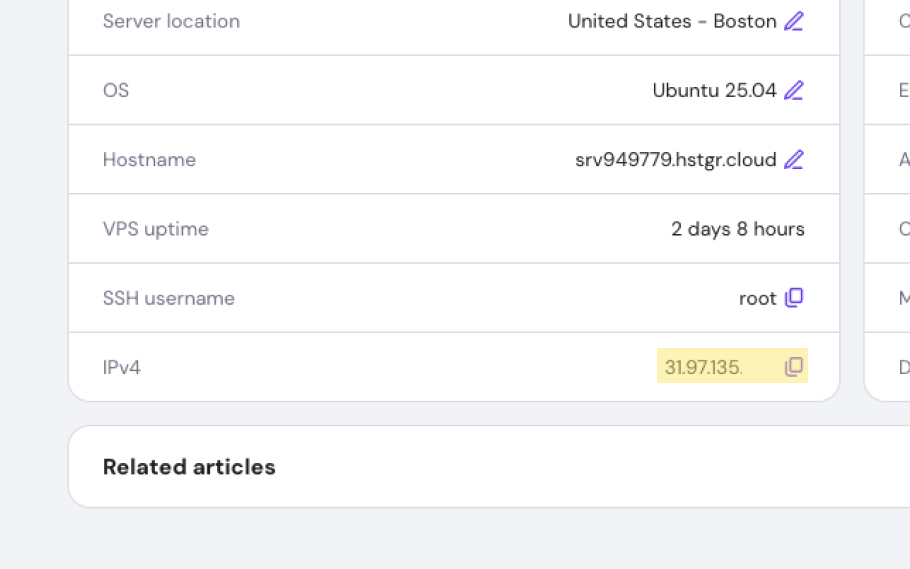
Add your VPS IP address as an A record. You can find this IP address in your Hostinger dashboard.
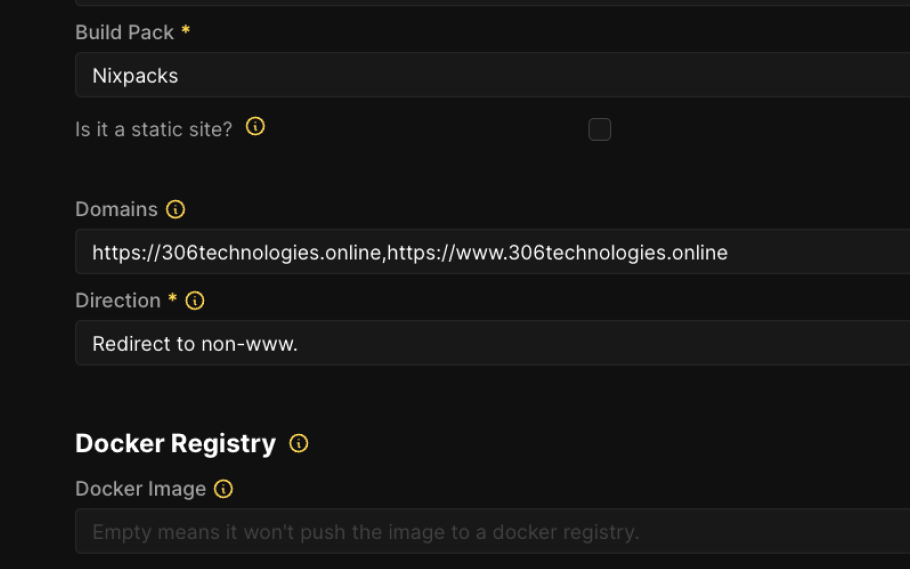
Back in your Medusa server application on Coolify, add your domain name in the Domains field. Be sure to include both the www and non-www version of your domain.
Below the Domains field, you’ll find an option to set the redirection for your domain. Choose to redirect to the non-www version, so your domain always points to: https://your-domain-name.com.
Next, update the MEDUSA_BACKEND_URL with your custom domain URL. Also, add the same custom domain URL to ADMIN_CORS, AUTH_CORS, and STORE_CORS.
Do this for both the Medusa server application and the Medusa worker application.
Redeploy both the Medusa server and the worker, and you should be all set. Just keep in mind that DNS propagation can take a few hours, so a little patience may be required.
1STORE_CORS=<medusa-server-domain-name>
2ADMIN_CORS=<medusa-server-domain-name>
3AUTH_CORS=<medusa-server-domain-name>
4JWT_SECRET=supersecret
5COOKIE_SECRET=supersecret
6DATABASE_URL=<postgres-url-internal>
7MEDUSA_BACKEND_URL=<medusa-server-domain-name>
8DISABLE_MEDUSA_ADMIN=true/false
9MEDUSA_WORKER_MODE=worker/server
10PORT=9000
11REDIS_URL=<redis-url-internal>
Create Admin User
You can easily create an admin user, using the your Medusa server terminal in Coolify. Go to your Medusa server application, and then the “Terminal” tab.
Run the following command to create an admin user. Be sure to replace admin-medusa@test.com and supersecret with your own values.
1npx medusa user -e admin-medusa@test.com -p supersecretSeeding Your Medusa Project
If you want to seed your Medusa project with demo products, run the following command from your Medusa server terminal.
1npm run seedTroubleshooting

Have questions or need help troubleshooting? Reach out to me on X (Twitter) @RajFrom306. I’m happy to help.
If you need a more advanced deployment setup or help with Medusa JS development, feel free to reach out through our contact form.
Related Articles

How to Connect Medusa JS to Supabase: Step-by-Step Guide
Connect Medusa.js to Supabase Postgres in just minutes, no Docker setup required. This step-by-step guide walks you through creating your Supabase project, linking it to Medusa, and exploring the database structure that powers your store.


Deploy Medusa JS to Railway: A Complete Step-by-Step Guide
Ready to launch your Medusa JS backend like a pro? This step-by-step guide shows you how to deploy on Railway with ease — fast, scalable, and production-ready.